Saturday, 24 March 2012

Home stretch

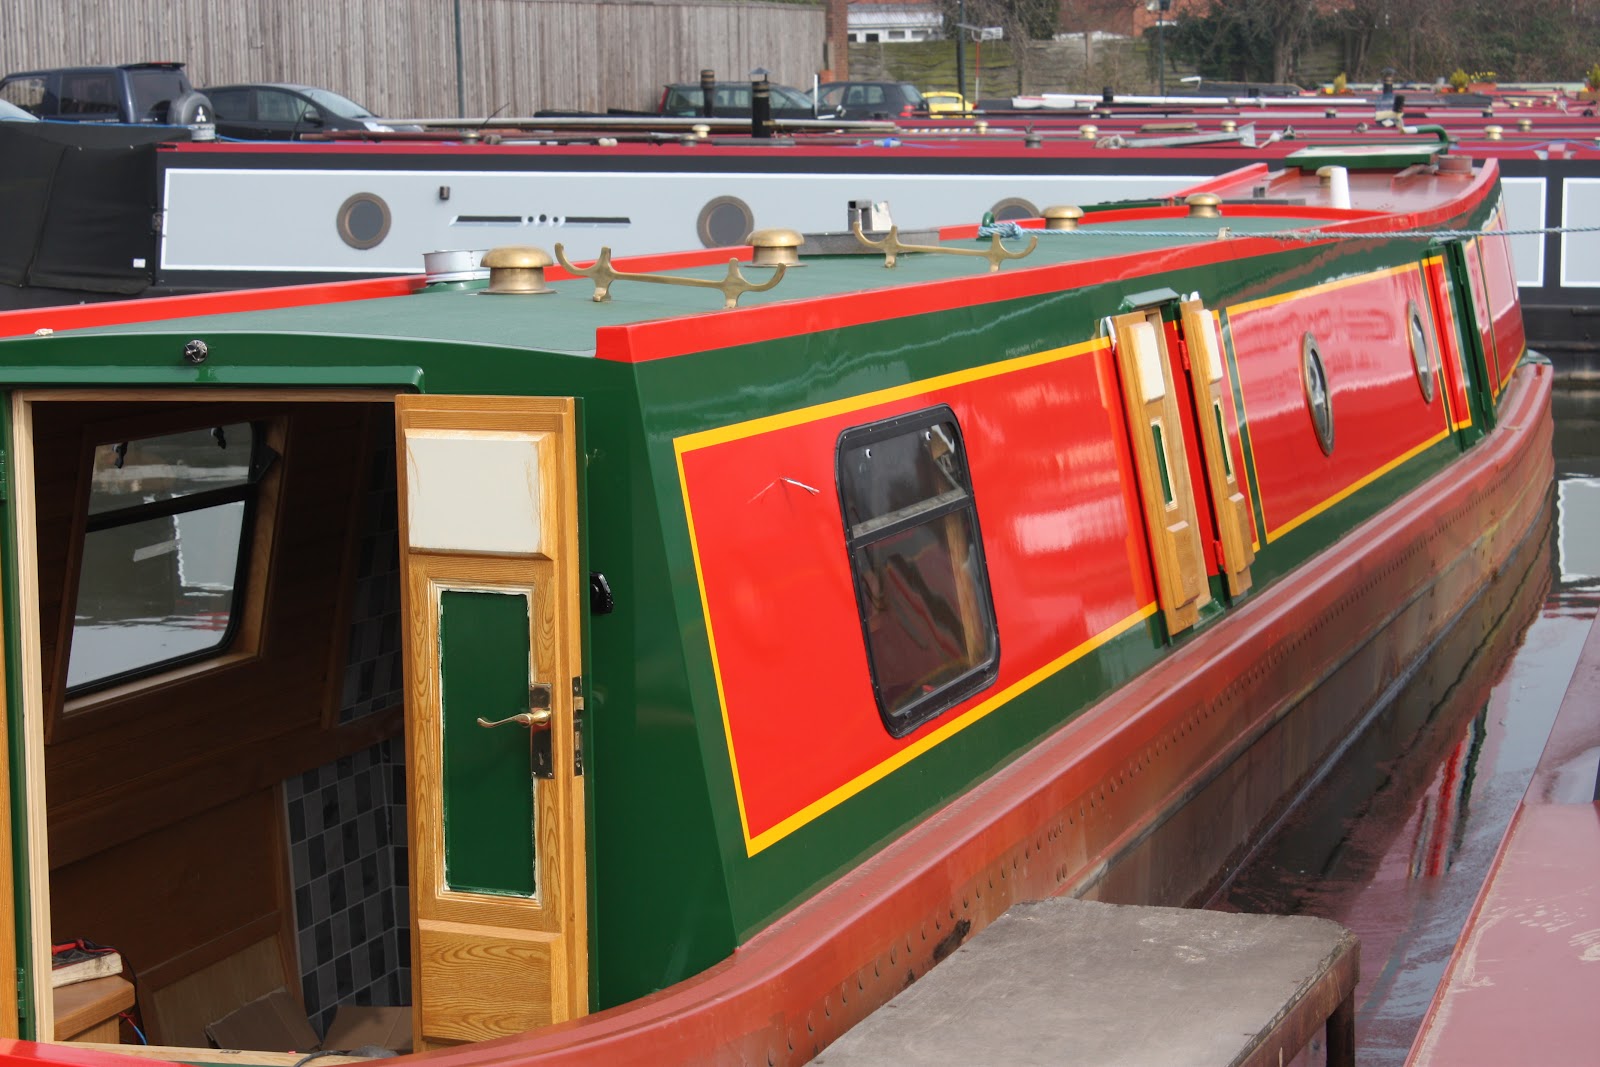
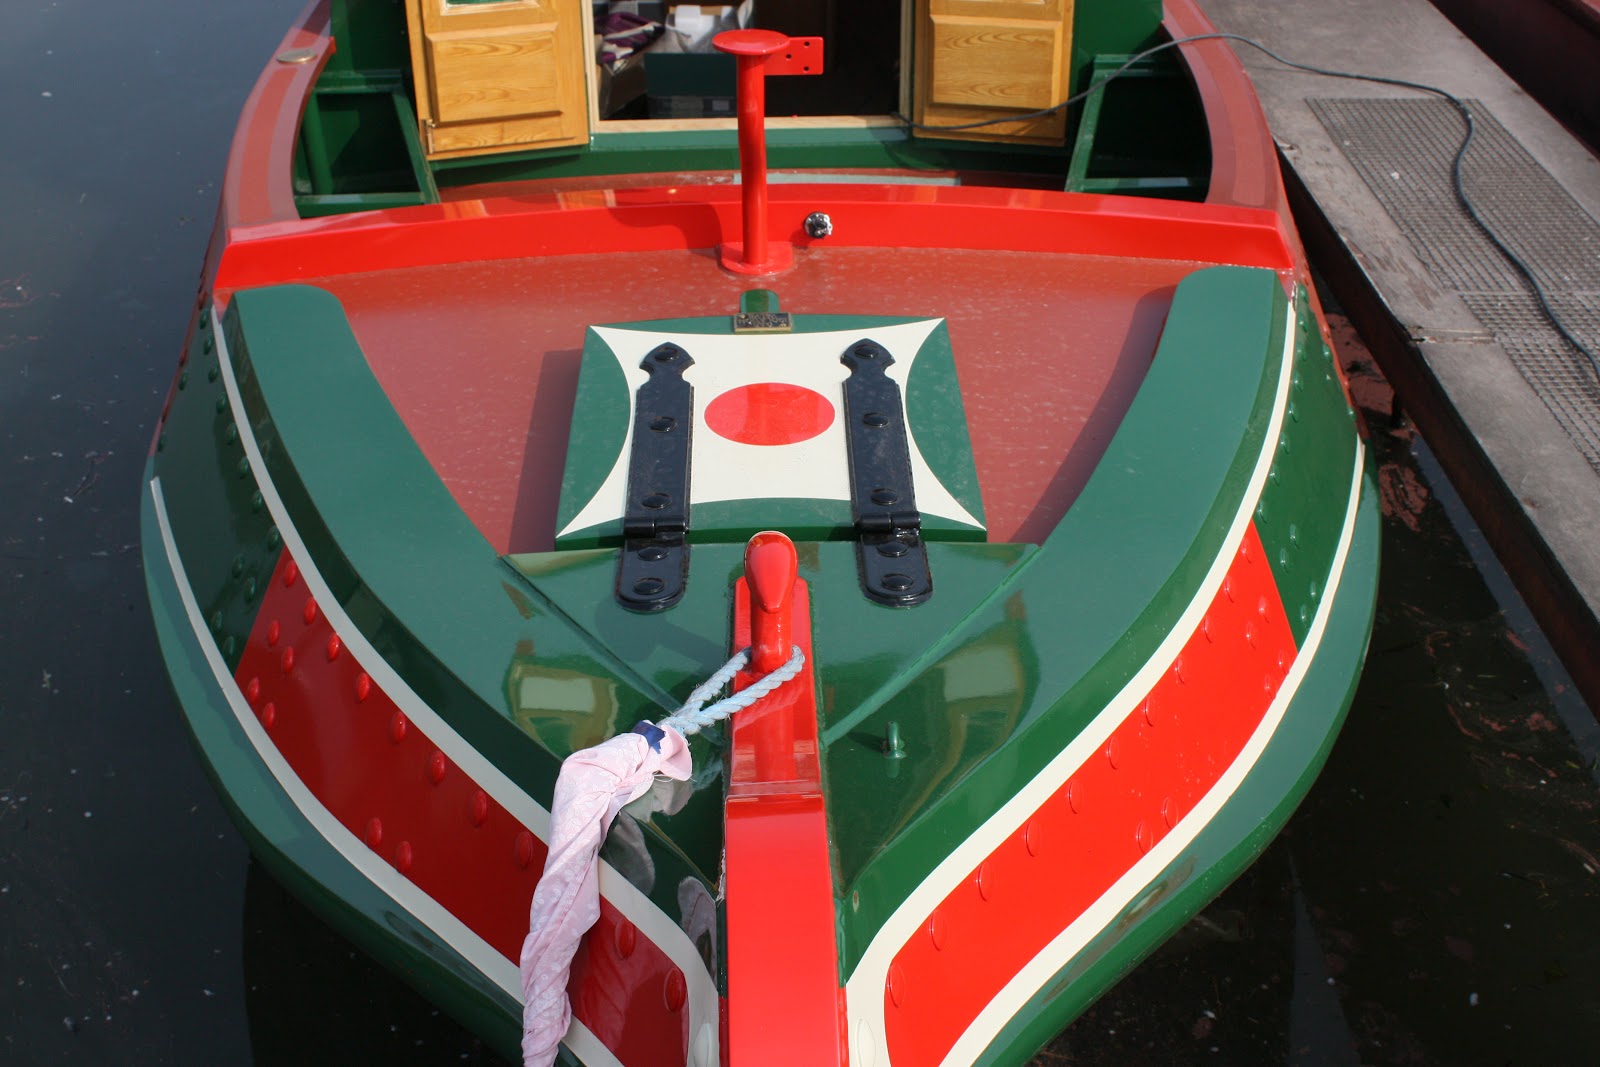
Finally get the chance to see the new paintwork in daylight. Windows and portholes are back in, hatches replaced plus a few extra bits of brassware. The painted pigeon boxes were also spied in one of Steve's storage containers awaiting fitment.

Work can now start in earnest adding fittings such as the diesel water heater, calorifier, stoves, loo and kitchen appliances as the home stretch approaches. Then there are the boat electrics to be hooked up. Five service batteries plus a starter one in the engine room and a further two in the starboard well deck locker for the bow thruster. The DC switch panels have already been built and will include a visible engine start panel and a helm panel by the rear doors as well as the main control panel which will be hidden behind decorated doors in the tall engine room cupboard.

There will also be considerable work hooking up the engine life support systems as well as two alternators. Four tanks need to be accommodated in the engine room. Central heating and engine cooling header tanks, engine oil tank and the gravity feed fuel tank filled by hand pump from the integral main one below. I understand most of this work will be completed last though.


Although I was expecting to discuss the electrical installation at a later date, Martin, Steve's second in command seemed keen to get it sorted now. To this end Tony the electrician had been busy retrieving all the electrical goodies I had dropped off over previous months and laying them out all over the boat. Over two hours were spent with the two of them identifying the components, discussing their layout and how they related to my AC and DC wiring diagrams. Although a few we don't normally do it that way comments were made, it was generally agreed that the electrical installation could be completed to my requirements.


Pleased to see the tile grouting has now been completed, with the mosaics in the bathroom particularly eye catching against the bumpy white tiles.


Glossy BMC and rear of engine room as paintwork preparation continues.

Neat plumbing below galley sink.

Friday, 9 March 2012

Technicolour tease

Still not quite out of the paint shop and consequently no further work on the interior. Seems the cold snap created staff sickness despite burning huge quantities of propane keeping the place warm, and adding to the delay. Should be out in a day or so though and worth the wait as these pictures attest, although the colours may be a little different in daylight.


Hatch covers awaiting re-fitting. The one in the foreground is the sliding hatch for the rear cabin.
Trade mark Hudson casting for the rudder stock boss. Rear plate is to mount the stern nav light.


Whilst I was taking photo's the brass pole racks were added and mushroom vents replaced. The paint on the BMC, engine room roof and gunwales is a silk finish to emulate the traditional red oxide. A non-slip surface is added on the gunwales and the green forward part of the roof.

Whilst I was yet again disappointed at the slow progress made, I do have a firm completion date now of the 25th May. Not at liberty to explain any more at this stage, but consoling myself with the fact that I will have the use of the boat during the warmest part of this year.

As I had some time to kill before my train journey, Steve kindly offered me his personal 37 foot tug for a chug up the cut. A brave man I think as this was my first solo trip on a canal, and a narrow one at that. An enjoyable experience but after being spoilt by the wheel steering on my yacht, will need to build up the arm muscles.


Will be visiting more regularly now as I expect the pace of work to creep up again, with discussions needed for the the final fittings particularly the electrics. Hopefully better pictures next time to include the interior nearing completion.

Saturday, 28 January 2012

Paint it red

The boat is already in the paint shop. It seems the previous job finished earlier than expected, so no time was wasted getting Ecky Thump in. Unfortunately this limits my access to the boat I'm told. External fittings are stripped out, with flatting and initial masking nearly completed. A week of dusty work. Don't envy these guys.


Colours have been mulled over, changed, advice taken, samples provided, but we finally have something approaching the original red, green and yellow used on post 1921 Fellows, Morton and Clayton working boats. I say approaching because despite all the research no one seems to know for sure, so am taking an average of opinions commensurate with what pleases me. Having compared my choices with a multitude of restored working boat photo's, Traffic Red , Mid Brunswick Green and Golden Yellow have won the day. The green should be a good match to the Lister green in the engine room. A creamy white will be used for the traditional upper band on the stern and to outline the detail paintwork on the top bend. Paint layout for the cabin sides at least, can be seen in the blog title.

Given the boats early visit to the paint shop I may have delayed my monthly visit, but the train tickets had already been booked. Promising to be on my best behavior and tread carefully, I persuaded Steve to let me have a peek inside.

Tiling in the galley is complete bar grouting and looks great especially now the sink and mixer tap are in place. Pity this area is still in disarray, but not for much longer hopefully.

Tiling in the bathroom is also complete with vanity basin fitted, but awaiting the matt black mixer tap. This rather expensive must have is causing some minor concern as they can't get it apart to tighten connections.
This shower is going to look superb when finished.


The scumbling in the BMC is also complete with the engine room nearly so, and presently being worked on.
Radiators have been installed in the saloon and bedroom and although difficult to see, I suspect a fair amount of plumbing has been completed. I also noted second fit wiring had been started and all light switch box's installed.

Obviously all welding needs to be completed before painting, so I was pleased to see the late addition answer pins had been provided. Also noted was the provision of exhaust flange in the engine room roof panel. 

As I had brought it with me, Steve confirmed the design and positioning of the horn bracket so welding could be completed later that day.


Also discussed was the number and type of electrical fascia's for AC outlets and light switches etc. Vantage Flatplate flush fittings will be used in brushed stainless with black inserts, so a trip to CEF is planned.

Next visit is scheduled for February 28th when it should have emerged resplendent from the paint shop - can't wait. Still a long way to go though so finish date will probably be in May now.

Wednesday, 21 December 2011

On the tiles

Christmas with family in Hull gave me the excuse to detour the car journey via Tamworth, dropping off the recently purchased Zanussi compact washing machine to allow timely installation. I had already been advised the varnishing was complete but was eager to see how the tiling was coming on.

Unfortunately Steve's tiler had taken extra leave shortly after starting, so had been unable to finish before Christmas. He had completed the tiling behind the saloon stove though, complete with grouting.


I suppose I was generally disappointed at the amount of work completed since my last visit a month before, but close inspection showed many small finishing touches including the trims around the edges of tiled area's. Looks like the galley tiles will be next.


The bedroom looked good with varnishing completed to a very high standard in a smooth silk finish.

A closer inspection of the dressing table extension revealed a slide out support. Not sure if I missed this last time or its recently been added.


In the engine room and BMC the undercoat in preparation for scumbling has been applied. This in turn to give an artificial wood grain effect in keeping with old working boats.


At the rear of the engine room the trim around the start of the aft swim curvature can be seen just to the right of the boxed in fuel filler pipe. Its hoped that the large oil tank required by the dry sump engine can be accommodated on supports at this level. This would leave the tank high enough for easy draining as well as allowing  removal of the floor hatch to access the diesel fired water heater below.


I also tried the fit of another recent purchase, a Samsung LED Smart TV with HD tuner. With low power consumption, very thin profile and light weight, its ideal for a compact boat installation. I enjoy my TV, so consider a 32" screen as the minimum for HD viewing. Wireless connectivity to the Internet and my laptop is an added bonus. Steve will have a pattress made to provide a vertical surface for the the mount, counteracting the tumblehome of the cabin side as well as providing a more sound base for securing. As this mount weighs almost as much as the TV, l don't think I will need to worry about security of the TV itself.

After agreeing on the paint scheme we discussed schedules for completion. It seems my boat will go into the paint shop at the end of January so a visit late next month,  just before was confirmed. Final completion date is now back to April - ho hum. Well March would probably be too cold anyway.

Saturday, 19 November 2011

A sticky situation

Well as the title suggests my latest arrival at Steve Hudson's yard coincided with the first coat of varnish being applied. Tiles, shower fittings, TV mount and a microwave were first unloaded from the car before a progress photo shoot. This was thankfully managed without getting stuck to the furniture. The saloon and galley had already received the first coat and the bedroom was next.

The pace of work seems to have slowed a little but I guess the finishing touches to the woodwork can take a while. Filling trim between cabin sides, ceiling and floor has now been added throughout as have the interior doors. Seen here the base for the BMC stove together with surrounding molded trim.


In the engine room, couldn't resist taking the tarpaulin off the engine for a photo. A very neat although larger than anticipated box step has been constructed to protect the top of the gearbox, interfacing with the double doors from the BMC. The price I have to pay I guess for having a minimal length engine room. Box can just be seen at the bottom of both photo's. The engine looks very comfortable in its near complete 'ole. Some thought will have to be given to shoehorning in the second alternator between engine and cabinet though, given the tight space.


Just doors and trim have been added in the bathroom pending tiling, but the bedroom now has a substantial shelf over where the radiator will be sited. The fold out dressing table extension has been added although seems to be waiting some form of support. This is to accommodate my laptop. The overhead cupboard now fitted will incorporate downlighters. Finally there is now a the shelf between side cupboards over the porthole matching the one in the galley, as can be seen below.


Slightly distorted image of the bedroom taken with a fish-eye lens. The folding saloon table and support can be seen on the bed, awaiting fitting after varnishing of cabin sides is complete.


Seen here is the neat folding semi-circular galley breakfast table, one and a half inches in thickness! The now wood trimmed doors will have glass panels that fold in from the cabin sides to create a window when its a little chilly. We plan to have two stools at the table, but will have to find storage for them when not in use.


Saloon doors now have their wood inner cladding. This will be later painted and decorated with roses and castles as will the galley and rear doors. The shelf above the radiator can be seen lower left, matching the one in the bedroom. Note how the American oak has taken on a lovely glow after only one coat of varnish.

The saloon stove base has been created with heat proof material lining the area above ready for tiling. I know there has been a recent change in the safety regs for installing them which may account for this. Note also the chimney collar surround in the roof above.


Steve seemed enthusiastic when I showed him the Klaxon horn and soon had a template made up for a suitable support bracket to be welded to the lamp mounting. We also discussed mounting the articulated TV bracket I had bought, on the cabin side. It will allow the TV to fold flush when not in use, although the tumblehome of the cabin sides will need to be accounted for so its level when in viewing position.

Paint scheme was discussed and it seems that there is one boat ahead of mine to go through the paint shop. This after the present one leaves. This will probably mean the projected finish date is put back to March. Also discussed was the tiling patterns but expect to be able to see the results when I next visit just before Christmas.

Wednesday, 16 November 2011

Distraction

As alluded to earlier in this blog a secondary interest sprung up in the form of buying and restoring vintage car horns. Since the first Desmo one I've learned something of the history of various marques. Interest has moved towards the motor driven types where a spinning serrated rotor acts on a hardened steel stud riveted to the centre of a spring steel diaphragm. The resulting sound is best described onamatopoeiacally as awoogah and typified by that heard on many vintage cars. Early versions were manually operated directly, usually with a push button driving a flywheel, but later an electric motor was used so they could be operated remotely. Both sides of the Atlantic the Klaxon brand name became synonymous with the generic type.

Having acquired a Klaxon Klaxonet, I was impressed with the quality of construction as well as the sound. When I learnt of the existence of the big daddy A1 model, also known as the model 20 in the USA, it became a must have. Its monster size and weight, 8 inches across the trumpet and nearly 4Kg, fitted in well with the OTT image I planned for my boat.

These horns are very rare particularly the long trumpet versions, but do appear very occasionally on eBay, although usually with unrealistic starting prices. I did eventually manage to acquire one privately though.

This particular horn is a long trumpet French version from Klaxon's sister company in Paris, probably built in the 1920's. Strangely it doesn't have a model name, just Klaxon being displayed on the plaque. Many of the British built A1 models had a mounting bracket supporting the bottom of the motor and attached to the lower part of the trumpet flange. This one has the bracket incorporated in the trumpet flange which is reversible and better suits my needs.

Solid brass construction apart from the brass and copper plated underslung motor suggests yet still more polishing experience. Although the plating on the cast iron motor housing is worn, I have just polished and lacquered that part for the moment. The sound is vicious, almost frightening in intensity and not dissimilar to a very angry duck, which sits well with its future location on the water. Just need to find a place to mount it now.

Although the recording (on my phone) doesn't really do it justice, you can hear it for yourself


Needless to say interest in the Desmo one has wained and its already been sold on eBay to help finance this purchase.

Saturday, 22 October 2011

Taking shape

I guess everyone having a boat built goes through the frustration of waiting for the fit-out to be completed. Even when its proceeding at normal pace it still seems to take forever to get from one stage to the next. Certainly the woodwork fit is the longest with almost every part being custom made. My now monthly visit to Ecky Thump revealed through a thick layer of sawdust, the end of this stage at last in sight though.

Starting from the front this time. The saloon corner cupboards have been completed with a single matching overhead one to port. The starboard side area is reserved for a TV on an articulated mount so it folds out of the way. Phil, the carpenter assigned to my boat, was completing the shelf over the radiator in this area which, save cupboard doors and some trim, is complete. His work area inevitably getting smaller.

The galley looks more recognisable now with worksurface and cut-outs awaiting sink and gas hob. I noted the gas pipe has been run from the bow storage area as well.


Fridge, Oven and Microwave stack awaiting appliances to left. Cutlery draw to right.


No further work on the essentially complete bedroom but Phil had been very busy in the compact walk through bathroom. The quadrant shower tray is fitted and plumbed. A low cupboard to fill the gap between cabin side tapering to open towel shelves to the ceiling.

Unfortunately the position of the porthole precluded the planned corner facing vanity basin worksurface/cupboard. It was decided that a plain corner unit would sit simply on top of the now boxed in poop tank with a shallow overhead cupboard over the loo, leaving plenty of room for a mirror above the basin.

The engine room has the floor to ceiling utility cupboard fitted, another Hudson trade mark. The upper door hides the DC control and monitor panels, the lower AC switchgear with the external engine panel in between. Note that even this room receives beautiful wood mouldings ready to be scumbled, with the cabinet receiving traditional decoration of roses, castles etc. Bottom left can be seen the ceiling trim ready to fit below pigeon box.

The boatman's cabin (BMC) is probably the area with the greatest concentration of woodwork given its compactness. Pleased to report its essentially completed with all cupboard doors fitted. The larger one folds down to rest horizontally on the settee support opposite. The mattress within can then be unfolded from the bed'ole. This will be Ecky Thump's guest bed.

The steel rear doors have received their wood inner lining with matching trim each side. Note beautiful hardwood step with another to follow below. Also mouldings to the left and original style cupboards, shelves and drawers all completed.


Completion of woodwork is expected in about three weeks. The porthole trims are fitted at a later stage after painting. I understand all doors are made though and ready to be fitted. After that varnishing will start followed by tiling, so a trip to the the local Topps Tiles is scheduled.

Steve has updated the finish date to February now with the best part of a month in the paint shop during January. I'm assured he can get a nice fug going in there. Can't wait to see the progress next month.